Table of Contents
Prelude
Yeah, I know, the title’s already promising enough. And yeah, it did happen. At some point in my previous post I mentioned that after group filtering failed on me I reverted to OU filtering. So at the time I had 2 filters in place. This may or may not be the cause of what happened next, but this is my best guess.
So a little while after posting the previous article, another sync occurred, and that’s where the shit hit the fan. AD Connect detected 44 deletions and promptly nuked all these users from Azure AD as well. There’s clearly something wrong with AD Connect because all those users were still members of the specified security group and the specified OU as well. Maybe it just doesn’t like when you apply both filters, I don’t know.
The whole irony of this is that Preview 2 was the very release that (according to the release notes) introduced a new feature to prevent exactly this kind of situation:
When installing Azure AD Connect the feature preventing accidental deletions will be enabled by default and configured to not allow an export with more than 500 deletes. The 500 is a default value and can be changed. With this feature enabled, if there are too many deletes, the export will not continue and you will receive an email.
That’s cool, except I’m yet to figure out how to change this threshold. It’s sure as hell not exposed via the UI so one may be supposed to hack on it directly via the database like with the group filter. Whatever.
So the situation is this: all your on-premises accounts are intact but your Azure AD (i.e. Office 365) users are all resting in the recycle bin. Let’s see how you can fix this.
After all the users have been deleted from the Office 365 tenant, the first thing anyone would do is restore them, right? Except the erasure nuked the admin accounts, too. Oops. I had BIG (I mean, enormous) luck though…
Sometime, just a few months ago I activated 2 factor authentication for our admin accounts. At that point directory sync stopped working because it supports neither 2FA nor app passwords. And this was the exact thing that saved our whole tenant. I had to create an “in cloud” global admin account just for dirsync. After I’ve lost access to my regular account, I still could use this sync user on the portal, and with that I could recover all* the accounts.
* all, except my own. See my upcoming blogpost for details.
Recovery
So in this case I still had a global account. What’s the case if there’s zero access? I guess your best bet would be contacting them via sscc at microsoft dot com (monitored 24/7) from your alternate email address (all global admins are required to have one). Still, it’d mean a good load of verification and escalation processes. That could take quite some time. In the meanwhile you wouldn’t receive any emails. Holy hot damn!
But once you have at least one global admin account, you can just open the Office portal, open the Deleted Users container, select all the users and click Recover. All is good – at least in the cloud.
Now the emails are flowing in which is great, but your directories are split. You need to:
- Uninstall (and thus reset) AD Connect.
- Install AD Connect and set up OU filtering again, making sure you point it to a new, empty OU in your local AD.
- Move a less critical on-premises AD account to this new OU.
- Make some changes to this user (e.g. edit the description field) which makes AD Connect push an update to the cloud account, which in turn re-joins that with the on-premises account using SMTP matching (make sure the AD account’s mail attribute matches the Office 365 account’s UPN!) and thus converts the Office 365 user to an AD synced user.
- Once verified to be working, repeat this with all the other accounts.
Simple, huh? There’s a neat trick with which you can simply trigger an update for a lot of users: just select them, then open Properties which will open the Multiple Items editor. Just check the Description field or something else non-intrusive, type in something, then click OK:
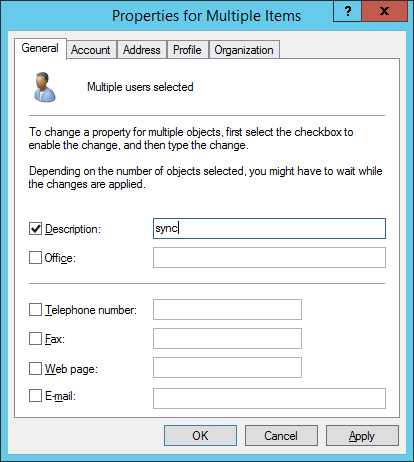
After these sync operations all your Office 365 cloud accounts should be back to normal, i.e. Synced with Active Directory. Of course, once this is done, you can revert the changes you made, e.g. emtpy the description field or whatever you edited.
Whew!