Table of Contents
Linode Account
Sign up to Linode. You’ll have to top up your account with at least $5 and your account will be manually reviewed, too. To me it took around 40 minutes, so it’s a good opportunity to set up our SSH keys till then.
SSH Keypair
In layman’s terms, key-based authentication is a bunch of stuff that allows you to log in more securely, and without a password, even. You store your public key on the servers you want to authenticate to, while you store your private key on your local computer. If it was an iris scanner, the public key is like a scan of your eyes in the door lock system, while the private key corresponds to your actual eyeball. And just like your eyeballs, you should keep your private key safe as well. Your public and private keys make up a keypair.
SSH stands for secure shell, and it is a way to manage servers remotely.
To generate a keypair, install PuTTY first, then open PuTTYgen and generate an RSA keypair with 8192 bits. Make sure to specify a passphrase as well. Relax, you only need to enter this passphrase when you reboot Windows, but more on that later. Key comment can also be useful if, for whatever reason, you’ll have multiple keys later on.
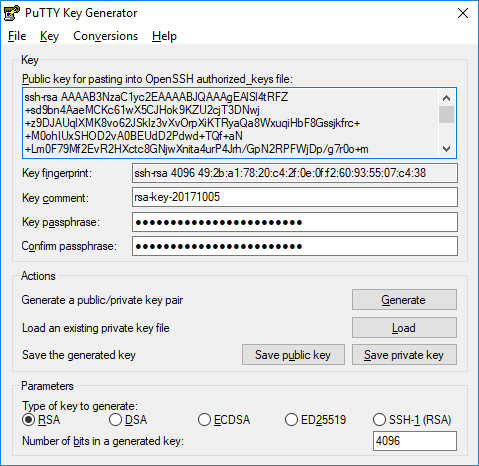
Grab a pen drive and save 4 files there:
- Click Save public key and save it as
id_rsa.ssh2.pub(public key). - Copy all the contents of Public key for pasting into OpenSSH authorized_keys file and save it as
id_rsa.openssh.pub(public key). - Click Save private key and save it as
id_rsa.ppk(private key). - Click Conversions / Export OpenSSH key and save it as
id_rsa(private key).
This might sound confusing now, why 4 files? That’s still just 2 keys (a public and private one), just in different formats, so don’t worry.
It is a good idea to have a secondary USB drive and make a copy of these there, then lock it up somewhere in case your pen drive is lost or something, otherwise you may have trouble logging in later.
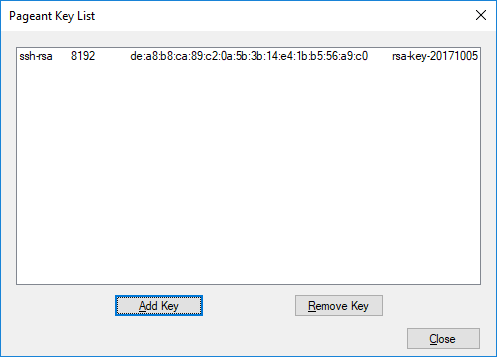
Now start the Pageant utility, which caches your private key as long as it’s running, so that you don’t have to unlock it every time you log into SSH. Right click on its tray icon and click Add Key. Enter your passphrase, and that’s it, your private key is cached. You can verify it via View Keys:
Now you’re ready to fire up your first CentOS server.
Linode VM
Once your account’s ready, head over to their management portal and create a new linode (that’s what they call virtual machines, or VMs for short):
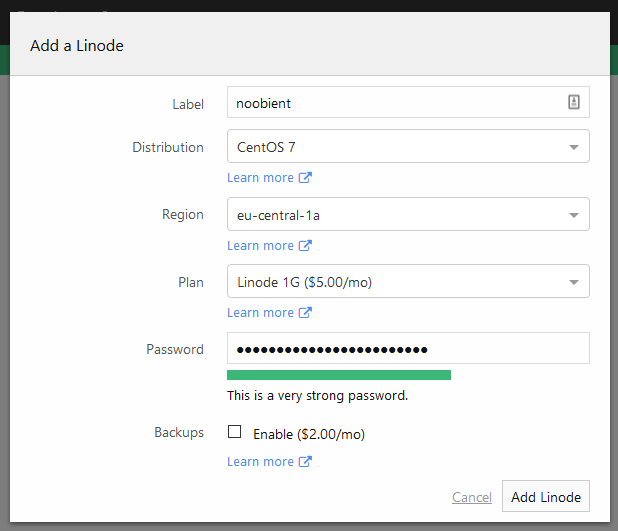
Things to pay attention to:
- Select CentOS 7 as the distribution.
- Select the region closest to you and/or your audience.
- Select a plan that suits your need.
- Make sure you use a strong (24+ characters) generated password, but don’t use special characters like !@# coz Linode doesn’t seem to handle that well. Don’t worry about its length, you’ll only use this password for a short initial setup and for emergency coz we’ll set up key-based authentication.
Once the node is ready, some fine-tuning first. Linode nodes have a customized kernel by default. Let’s switch back to the stock kernel. Open your node’s dashboard and navigate to Settings / Advanced. Open the default disk profile and under Boot Settings select GRUB2. Also uncheck the option Enable network helper because it will mess up the SELinux context of your network config files. Now click Save.
First login
Right click on Pageant and select New Session. Enter the IP address of your node in the Host Name field, then click Open. Then PuTTY will warn you that the host key is not present in the local cache. That’s fine, this is the first time you log in, so click Yes. Now log in as root and enter your password, too (you can paste with right click or Shift+Insert – it won’t be visible as asterisks, but it’ll be pasted anyway). If everything went well, you’ll be presented with a root terminal prompt:
login as: root
[email protected]'s password:
Last login: Thu Oct  5 14:24:40 2017 from 77.231.23.49
[root@li1419-124 ~]#
Kernel & SELinux
Fist off, reboot the node so that it switches back to the CentOS kernel and SELinux properly relabels the filesystem:
touch /.autorelabel
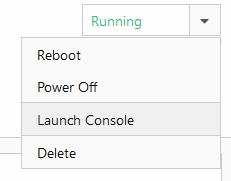
rebootThe SELinux relabeling can take a few minutes so be patient. This might be a good time to check out the console where you can see what’s happening without actually having terminal access (very helpful for recovery!):
After the reboot, verify that both the kernel and SELinux are fine.
Wrong:
# uname -r
4.9.36-x86_64-linode85
# sestatus
SELinux status:                 disabled
Right:
# uname -r
3.10.0-693.2.2.el7.x86_64
# sestatus
SELinux status:                 enabled
EL stands for Enterprise Linux, and it basically means you’re on Red Hat Enterprise Linux or its free counterpart, CentOS. So we’re good.
Updates & packages
Now some maintenance. Let’s upgrade all packages and install some new ones:
yum update
yum install mc bind-utils psmisc bash-completion chrony wget policycoreutils-python setools-console yum-cron git
Enable automatic OS updates (unlike on Windows, they actually work):
sed -i.orig 's/apply_updates = no/apply_updates = yes/g' /etc/yum/yum-cron.conf
systemctl enable yum-cron.service
systemctl restart yum-cron.service
Time
Check timezone, and if it’s not correct, fix it as well:
timedatectl
timedatectl set-timezone Europe/Berlin
Make sure time is corrected automatically via NTP (thanks billings!):
systemctl enable chronyd.service
systemctl start chronyd.service
Firewall
Tell systemd that we want the firewall started automatically upon boot, and also start it. Also query its status then:
systemctl enable firewalld.service
systemctl start firewalld.service
systemctl status firewalld.service
DNS
Replace Linode’s internal DNS servers with the Google and OpenDNS servers:
sed -i.orig 's/^DNS1=.*/DNS1=8.8.8.8/' /etc/sysconfig/network-scripts/ifcfg-eth0
sed -i 's/^DNS2=.*/DNS2=8.8.4.4/' /etc/sysconfig/network-scripts/ifcfg-eth0
sed -i 's/^DNS3=.*/DNS3=208.67.222.222/' /etc/sysconfig/network-scripts/ifcfg-eth0
systemctl restart network
Accounts
New User
It’s a bad practice to use the root (=admin) account for SSH access. So we create a new, regular user which is granted root privileges upon request:
useradd --user-group --groups wheel --create-home noob
passwd noob
This creates the noob account, prepares its home directory, adds to the wheel group (members of this group can get root privileges) and creates a corresponding user group as well. Then it sets its password as well. Make sure the password is strong enough, but also note that you’ll use your keypair to log in, not your password. Your password might be needed when something bad happens and you need to recover your system via the console.
Test this account, while you’re at it. Open a new PuTTY session, but this time log in with this new account instead of root.
login as: noob
[email protected]'s password:
[noob@li1419-124 ~]$
Note that you now have the $ prompt indicating a user session, instead of # which indicates root privileges.
Passwordless login
You already have a keypair, but your server doesn’t know about it yet. Let’s change that:
mkdir -p ~/.ssh
touch ~/.ssh/authorized_keys
chmod 700 ~/.ssh
chmod 600 ~/.ssh/authorized_keys
restorecon -rv ~/.ssh
Now you need to paste the contents of id_rsa.openssh.pub into ~/.ssh/authorized_keys. I recommend mcedit:
mcedit ~/.ssh/authorized_keysThe regular Ctrl+V won’t work here, use Shift+Insert instead. Save your changes with F2, then exit with F10 or by pressing Esc twice.
Now try to open a new PuTTY session and log in as your regular user. Verify that you can log in without typing your password, then proceed to the next step.
Becoming root
Even though now you log in as a regular user, you can still become root:
sudo -iRemember this command, you’ll use it a lot. If you want to exit from the root shell, just use the exit command, or press Ctrl + D.
You might have noticed that using sudo still asked for your password. You can disable this behavior using visudo. Look for this line:
# %wheel ALL=(ALL) NOPASSWD: ALLRemove the leading comment (the # symbol) and the following whitespace by pressing the x key twice.
Now look for this line:
%wheel ALL=(ALL) ALLThis in turn needs to be commented out, so you gotta put a leading # there. Press the i key to enter the so-called insert mode and press the # key. Once done, press the Esc key to exit insert mode. Now you can save your work with :wq. Yeah, vi is pretty fucking intuitive.
Now test the changes in a new PuTTY session (you can open as many as you want). Because if you messed up, you still have one root session open, so you can still fix it up if needed.
Only proceed further when you verified that you can log in with your regular user and become root with sudo -i.
SSH
It’s a good idea to change the SSH port from the default 22 to a random one under 1024 to get rid of at least some of the script kiddies. Why under 1024? Because ports under 1024 require root privileges to run, so you prevent random users from running rogue SSH server instances (thanks, billings and Bahhumbug!). In this example I’ll go with 922. Allow it both in SELinux and firewalld:
semanage port -a -t ssh_port_t -p tcp 922
firewall-cmd --new-service sshsec --permanent
firewall-cmd --permanent --service=sshsec --add-port=922/tcp
firewall-cmd --add-service sshsec --permanent
firewall-cmd --reload
Now tell the SSH server (or daemon) about this new port as well. While we’re at it, disable direct root logins and logins with password:
sed -i.orig 's/#Port 22/Port 922/' /etc/ssh/sshd_config
sed -i 's/#PermitRootLogin yes/PermitRootLogin no/' /etc/ssh/sshd_config
sed -i 's/PasswordAuthentication yes/PasswordAuthentication no/' /etc/ssh/sshd_config
sed -i 's/GSSAPIAuthentication yes/GSSAPIAuthentication no/' /etc/ssh/sshd_config
Now restart the SSH daemon:
systemctl restart sshd.serviceVerify that you can log in via port 922. If all is good, you can remove the default SSH port. Check the services that are currently allowed through the firewall:
firewall-cmd --list-servicesIt should list ssh, dhcpv6-client and sshsec. Now remove ssh:
firewall-cmd --remove-service=ssh --permanent
firewall-cmd --reload
And that’s basically it. You have your CentOS VM up and running with a properly configured firewall and SELinux, NTP for time synchronization, automatic OS updates and hardened SSH access.